The light in the first image is from full spectrum light bulbs. The light bulbs give the picture a yellow tint that looks ok but not great.
The second image was taken with the sun shining directly on the earrings. The direct light created the harsh shadows and washed out the color!
The third photo was taken on a well lit window sill but the sun was not shining directly through the window. The diffused light makes the photo bright and the colors clear. So remember, diffused, natural light is always best.
2. A Neutral Background
A neutral background is the next step to a successful picture. See the two pictures below:
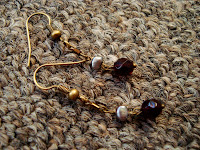
In the first picture, it's hard to tell where the carpet ends and the earrings begin! You also want to avoid including miscellaneous objects in the background which also take the focus away from your work. You don't want your viewer to associate your piece with the half-empty cup that's sitting on your kitchen counter.
The second picture gives a crisp, clean view of the earrings, suggesting to the viewer that they're ready and waiting to be worn!
Of course plenty of people use props in their photos to continue a motif or set a certain tone and that can be very fun. The key is to use the props in a way that accentuates, not detracts from the piece. In the photo below, I still used a white base but I added a dried rose in the background for effect:
3. Clear Focusing
Most point and shoot digital cameras are set so that if you push the capture button down just half way before you actually take the picture, the camera will automatically focus. Also, if you are taking a picture of something small and detailed, make sure you put you camera on the "macro" setting which is usually denoted by a small flower on the back of your camera body. Compare these two detail shots to see how much focus can make a difference:
The second photo is much more appealing and helpful to a viewer who is trying to see detail.
4. A Flattering Composition
In order to get a flattering composition, just keep in mind how someone who has never seen your object before would want to see it for the first time. This means considering the angle of the object, how much of the object to include, and where the object is in relation to the frame of the picture.
These are four simple steps you can take to give your work the flattering depiction it deserves. You don't have to have a fancy camera or be a professional photographer to take beautiful and appealing photos. Also, remember, taking photos can be really fun. After some practice with the basics, feel free to experiment and see what you can come up with to highlight you work!


